
How to Automagically Enrich Your Email Contacts
Email as a platform has one, big design flaw: it gives anyone in the world access to your attention.
We don’t have enough time for everyone in the world, so we’ve become experts at sniffing out everything that’s irrelevant. A missing name, a generic subject line, a picture of a person that’s nothing like you, a product you don’t need— all of these are triggers to immediately send your message to the spam folder.
Whether your a sales rep trying to follow up with a lead, or a marketer trying to juice your email newsletter, you can’t afford. Fortunately, with some light automation you can easily nip this problem in the bud. We’ll walk you through each step of the way.
Let’s Make This Personal
Leads and customers wind up on your email list for a dozen different reasons, and you need to be able to follow-through and deliver on each of those reasons. The only way to do this— aside from handwriting every email— is to segment your email list based on what your users are looking to get out of it. This type of personalization has proven to boost the ROI on email marketing campaigns up to 760%. You’re treating an email subscriber as an individual, and not lumping his needs in together with 1000 or more total strangers.
But segmentation is only possible with a copious amount of data.
Sales reps and marketers often jump through hoops to get their hands on customer information. They subscribe to expensive prospecting software, they download CSVs, and then they attempt to import the data or manually update it themselves in their email marketing tool. This immense amount of effort yields little results: they get lists full of incomplete information that grows outdated, fast.
Instead, you can set up an integration where data is piped in and updated in your email marketing service, automatically. You can segment based on up-to-date demographic or firmographic data, without forfeiting half your marketing spend or half a day’s work, every week.
For this to work, you need to be using an email marketing service that has an extremely flexible segmentation feature. For our examples, we’ll be using Campaign Monitor because it lets you create custom fields for each quality that you look for in your buyer personas— and then create multi-step rules, based on those fields.
Here’s a step-by-step walkthrough for how to create a truly personal experience for your entire email list.
1. Craft Your Segments Within Your EMS
A sales rep at a company of 10 people is going to have drastically different pain points and problems than a BDR at an enterprise company. But if you stick to the pre-designed segmentation options that come with your email marketing service, you’ll only be able to segment by name, location, or date subscribed. The startup sales rep who’s hustling to find ways to break into the market and the BDR who’s desperate to improve the efficiency of his team are talked to the same way.
For a truly personalized experience, you’ll need to take it a step further and create custom segments based on the buyer personas that are unique to your company.
Start by clarifying what differentiates your audiences. It can be:
- Demographic details, such as gender, age, profession, company of employment, etc.
- Psychographic details, such as hobbies, interests, lifestyle preferences, etc.
- Firmographic details, such as industry, vertical, size, age of company, amount of money raised, etc.
The specifications you decide above will make up your custom fields in your email marketing service. Based on those fields, you can create segments and rules for those segments for your drip campaign. You can also add a time element for lifecycle emails, on top of those buyer personas.
Set up a Segment in Your Email List
Within your email newsletter tool, you’ll want to create a couple different custom fields for your email newsletter lists.
In a tool like Campaign monitor, simply navigate to “Lists and Subscribers” on the navigation bar, click on the list that you want to segment, and click on “Custom fields.”
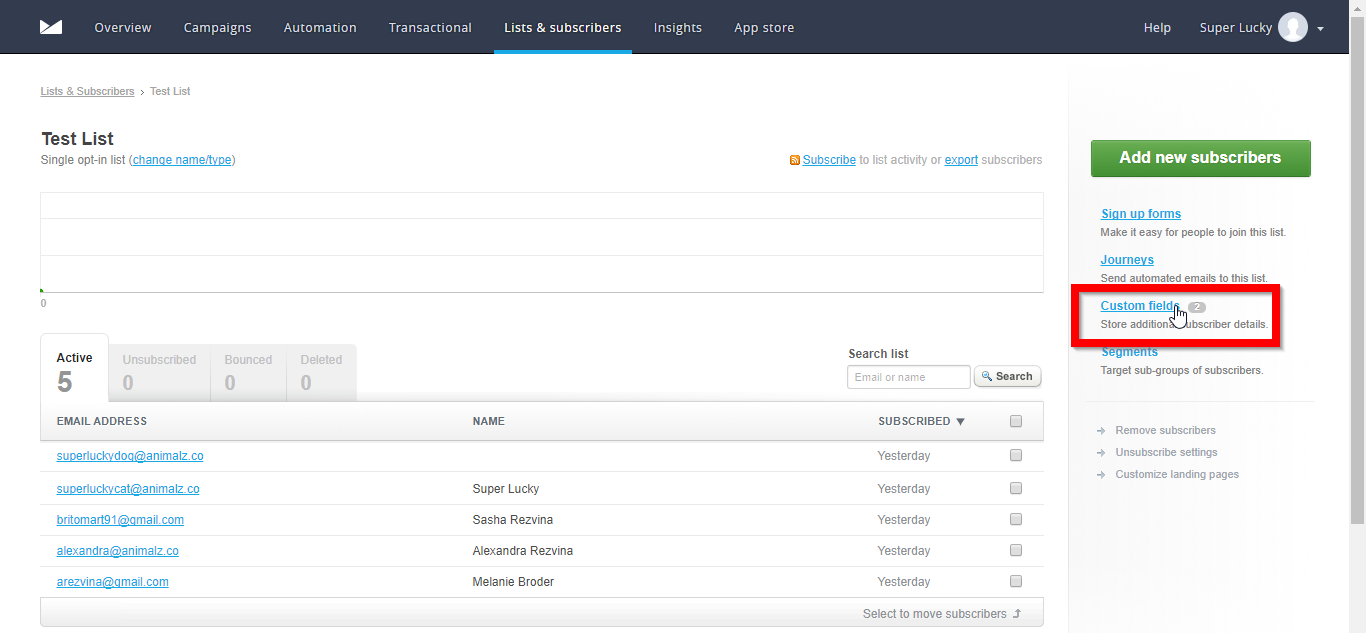
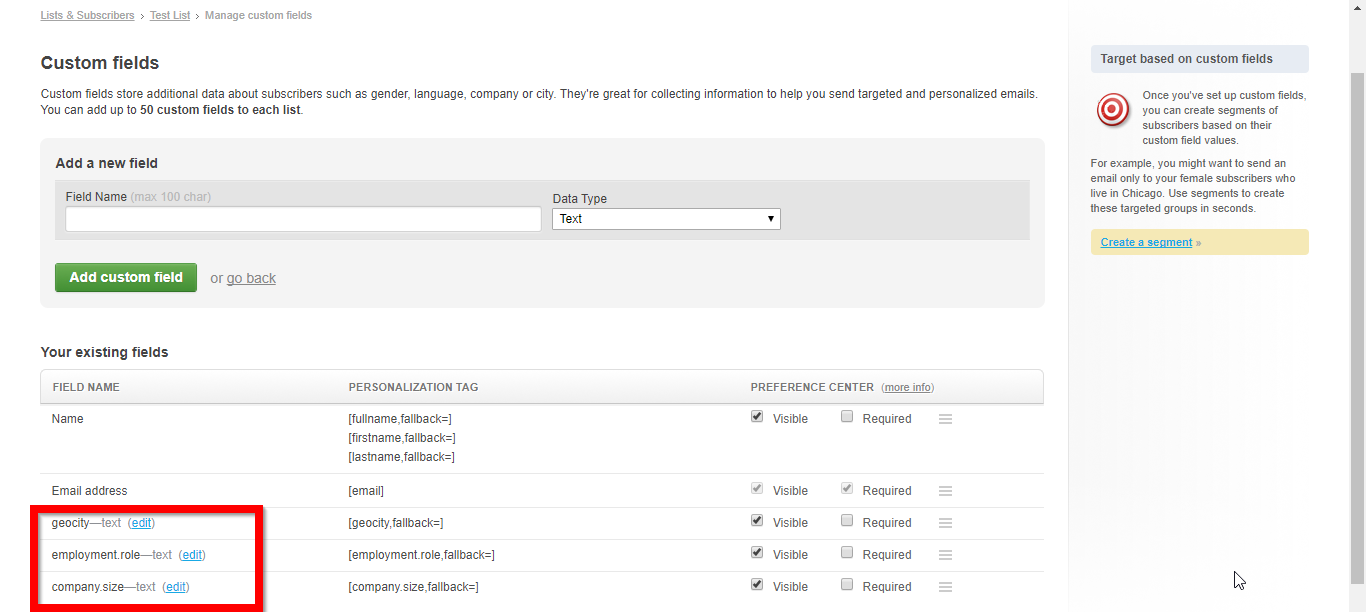
Then you’ll see an “Add a New Field” slot. Add all the fields that distinguish your personas from one another. If your personas are sales reps at SMBs and business development reps at enterprises within San Franciso, you might create custom fields for city, employment role, and company size:
Once you’ve set up your custom fields, click on “Create a segment” in the right-hand panel. This will take you to a page where you can create multi-step rules with AND and OR functions:
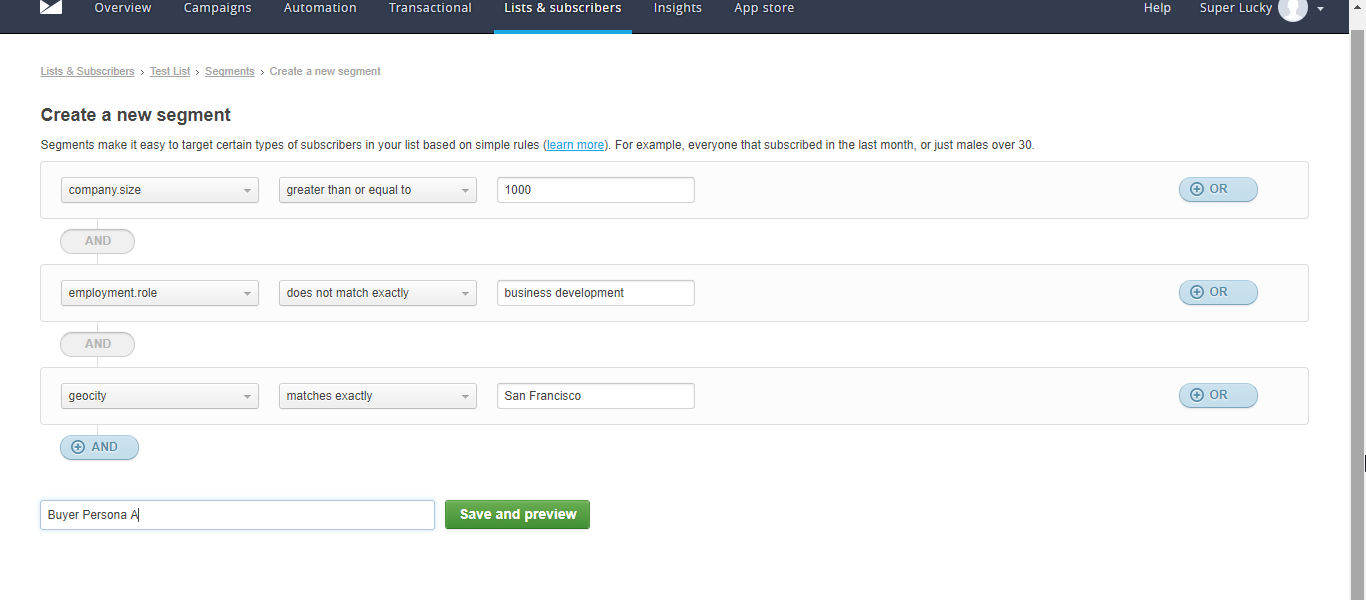
Name the segment and hit “Save and preview.” At this point, 0 subscribers should have been added to the list, since your email list does not yet have the data to fit the parameters you’ve denoted.
From here, you’ll need to connect Clearbit, a data-enrichment tool, to your email system so that the fields for each email fill-in and update automatically.
2. Connect Clearbit
Clearbit’s data enrichment API is essentially a lightening-speed Googler that will aggregate and spit out all the information on the Internet about one person or company, based on just an email address. Hooking it up to other tools enables you to auto-populate data fields if you know just one thing about your lead or prospect.
Clearbit can be integrated with most email service providers via Zapier, a tool that connects and sets up automatic data transfers between web apps. It operates based on a simple formula:
Trigger + Action = Zap
A trigger is some event that happens in an app, and an action is what you want to happen as a result of that trigger. Together, these make up a “zap,” which happens each time the event happens. You can also have multiple triggers and multiple actions, so that one event, or a series of events, set off an action.
For our purposes, the trigger will always take place in Campaign Monitor, triggering Clearbit to conduct a search and return firmographic, demographic, and psychographic details on a subscriber based on their email. Then, we’ll require a subsequent action where Campaign Monitor’s fields are updated, based on that data.
Note that to set this up, you’ll need a Campaign Monitor Account, a free Clearbit account, and a free Zapier account.
How to Set up the trigger
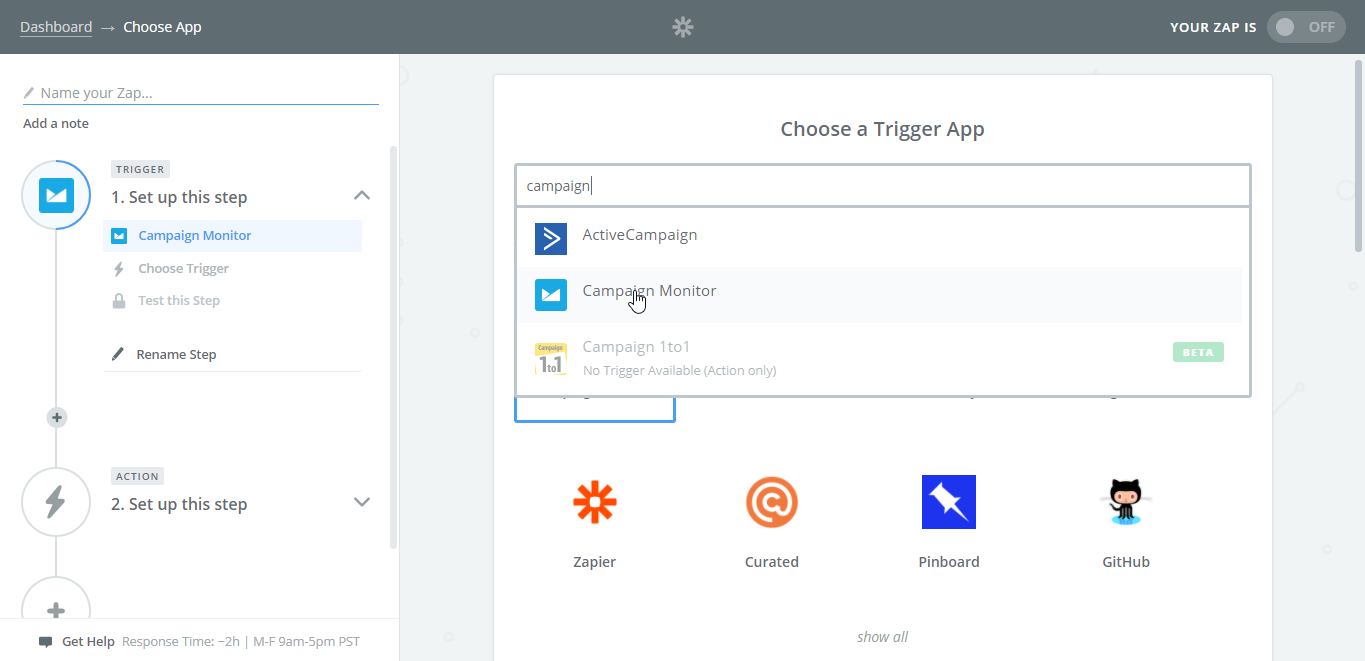
Start by selecting “Make a Zap” in the upper right-hand corner of your Zapier Dashboard. From there, you’ll come to a screen that will walk you through constructing your Trigger + Action formula.
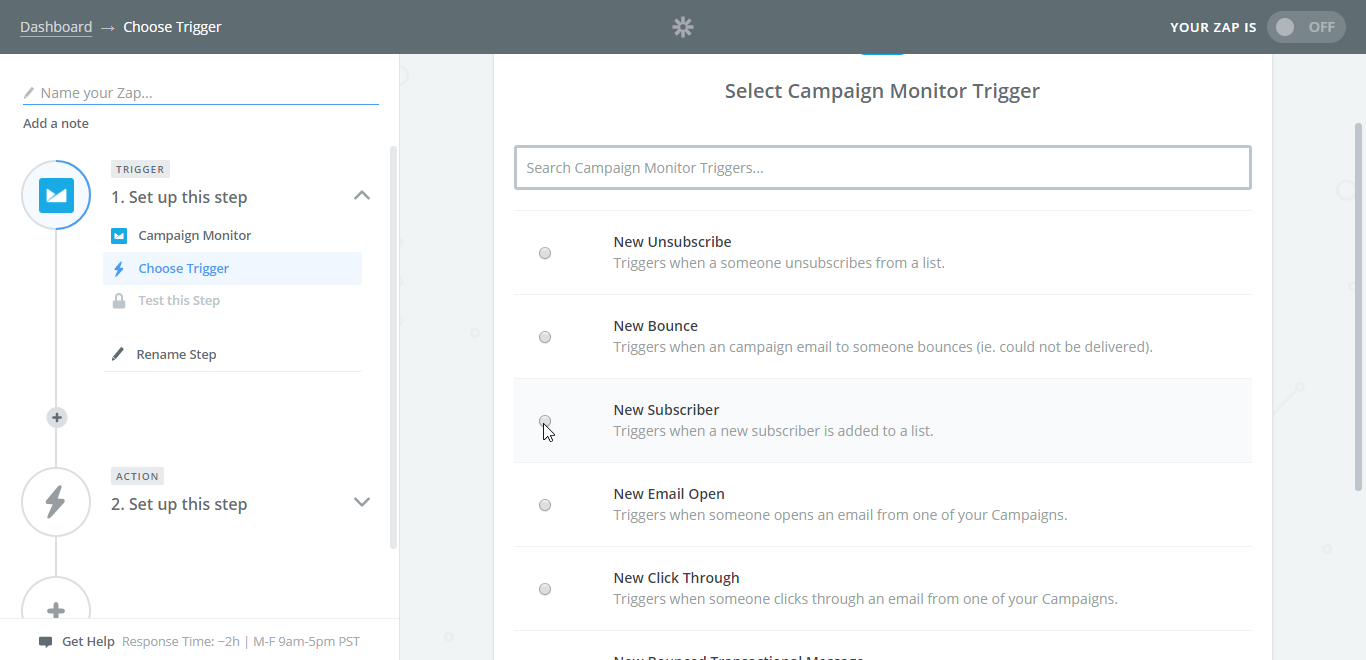
Search “Campaign Monitor” and select it as your trigger app:
To populate the fields for new email entries, select “New Subscriber.” The Zap will happen every time a new email is added to your list.
Next, you’ll see that your only option is to “connect an account.” Selecting that will prompt a pop-up that asks for your Campaign Monitor API:
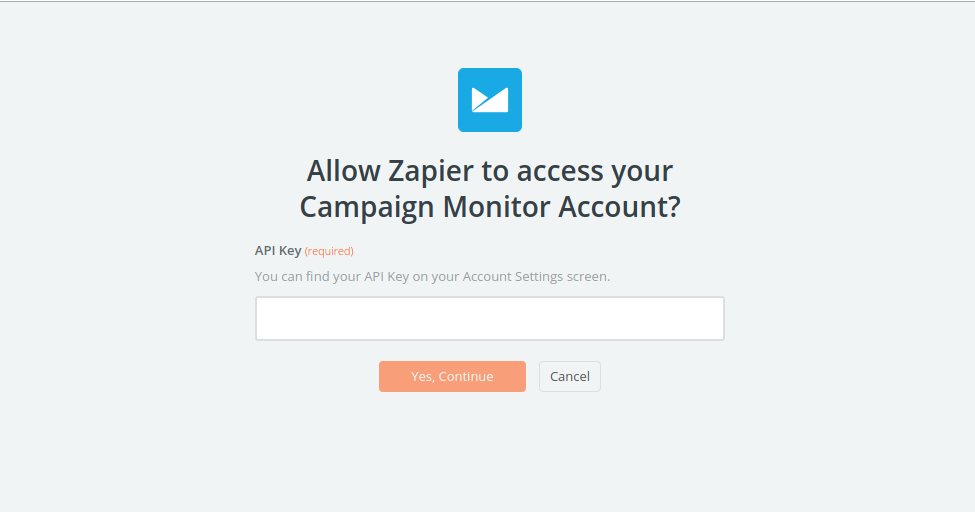
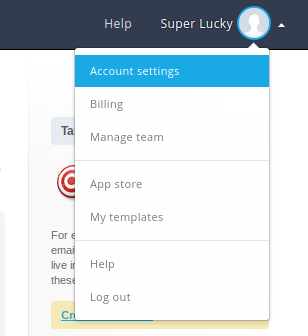
Grab the Campaign Monitor API key by going into your Campaign Monitor Account, clicking on your name and avatar, then going to Account Settings.
There you’ll see an option for “API keys.” Click on it, and then click “Show API Key.” Once you copy that over to Zapier once, your Campaign Monitor account will always be accessible from your Zapier account.
From there, you’ll be asked to pick your account name, and the list that you are trying to segment:
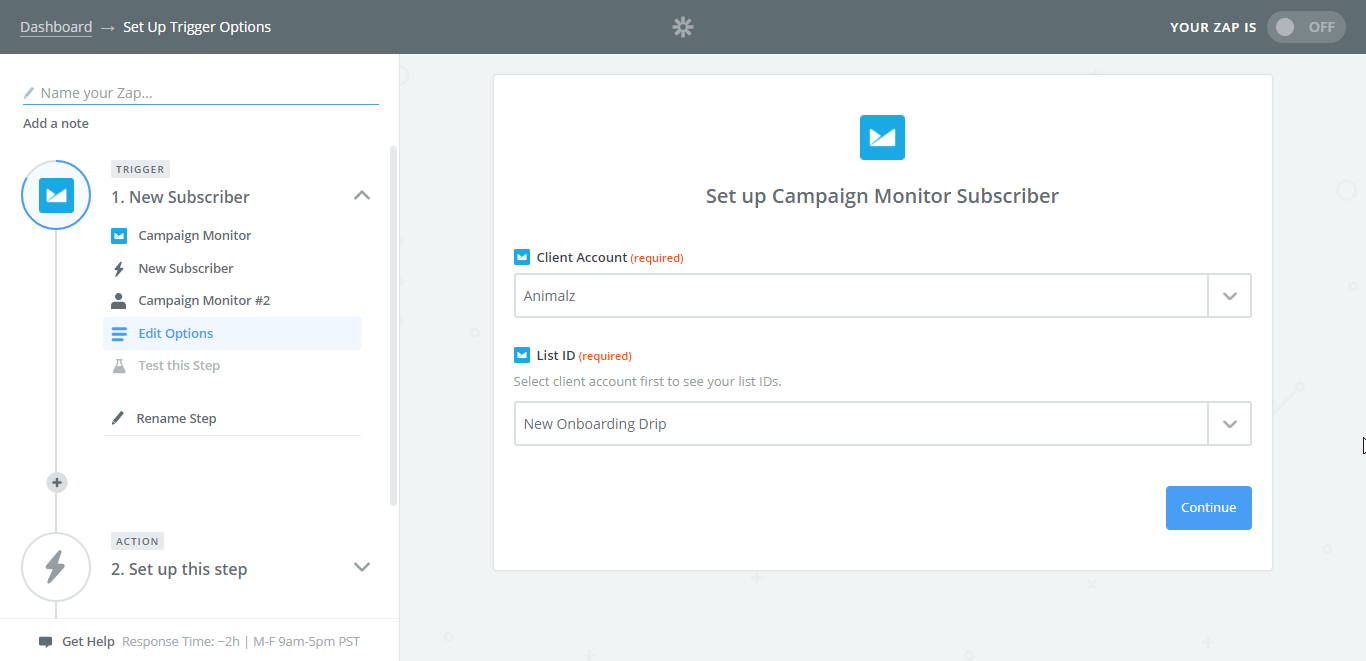
Once you run a test, you’re done setting up the trigger.
How to set up the action
Now that you’ve indicated to Zapier what event you want to trigger an action, you have to tell Zapier what information to fill in. Once you set up this step, you’ll have a complete user profile on every single subscriber that has signed up for your list. They’ll automatically be added to the segments you’ve set up, and they’ll give you an indication as to whether your lead gen strategy is working for your buyer personas.
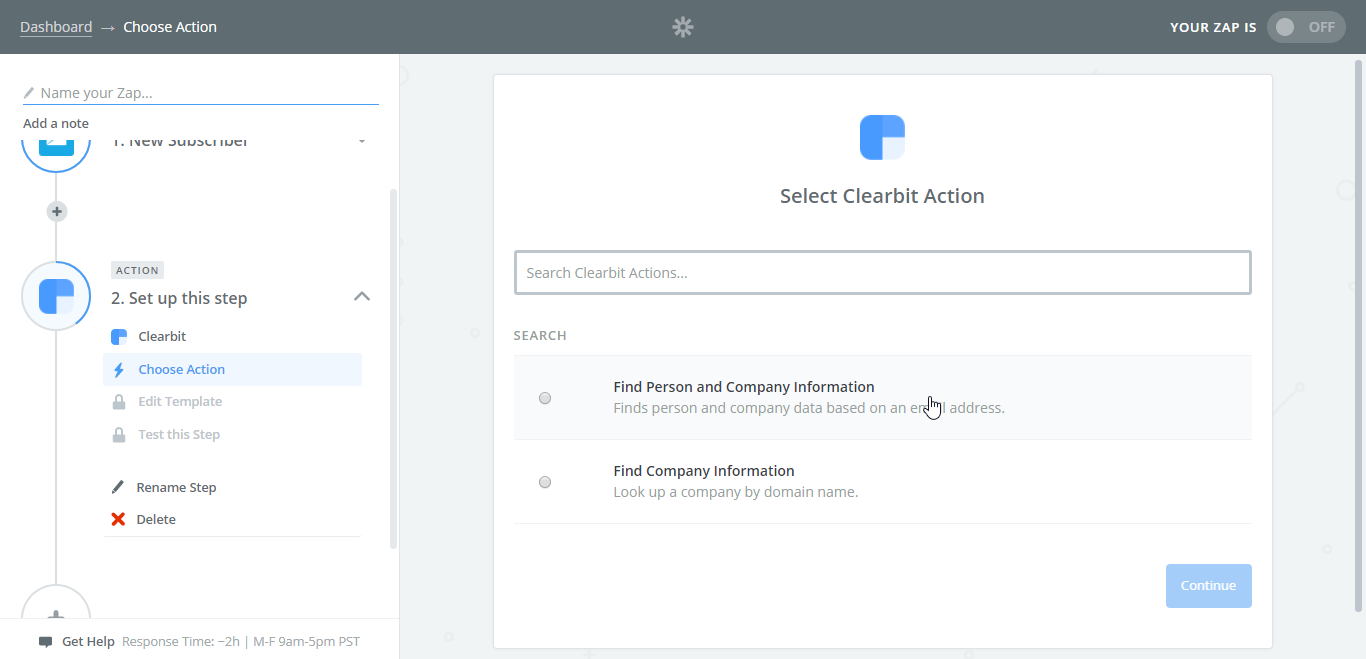
First, you need to get Clearbit to search all the information on a particular person and the company they work at. So for the next field, search and select Clearbit, and choose “Find Person and Company Information.”
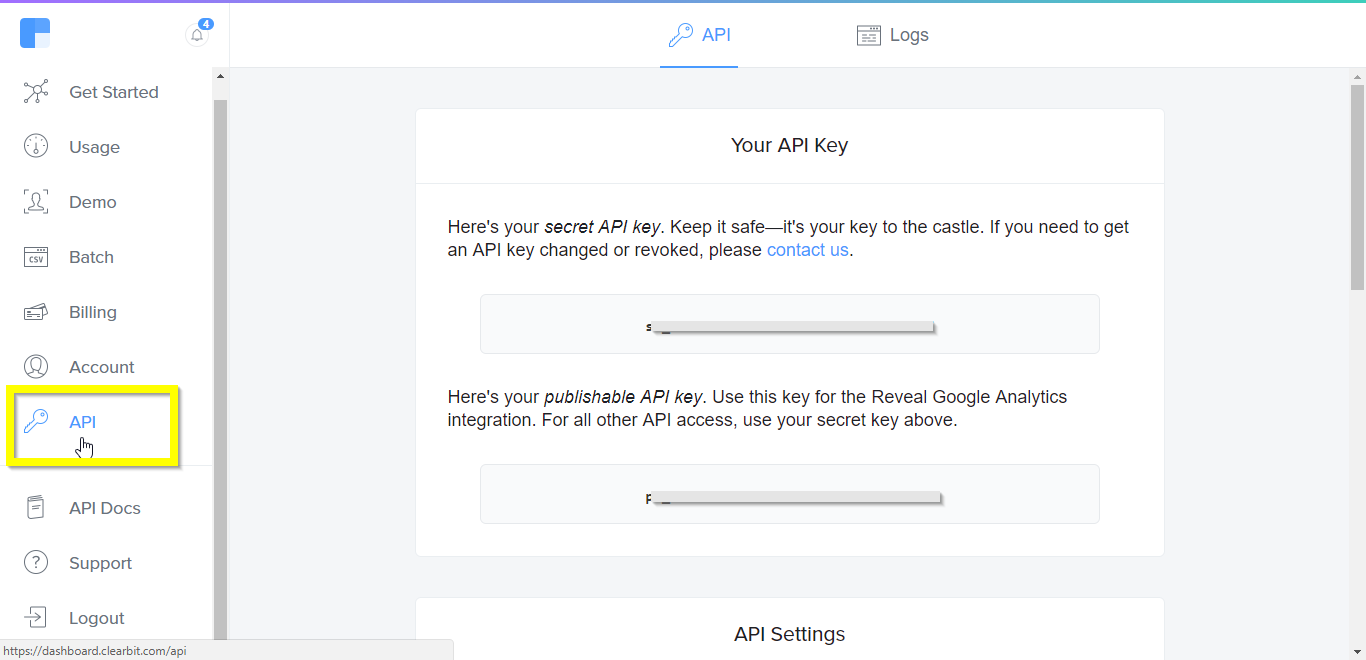
Next you’ll be asked to connect an account via an API, much the same way as you did for Campaign Monitor. You can find your API key right on your Clearbit dashboard:
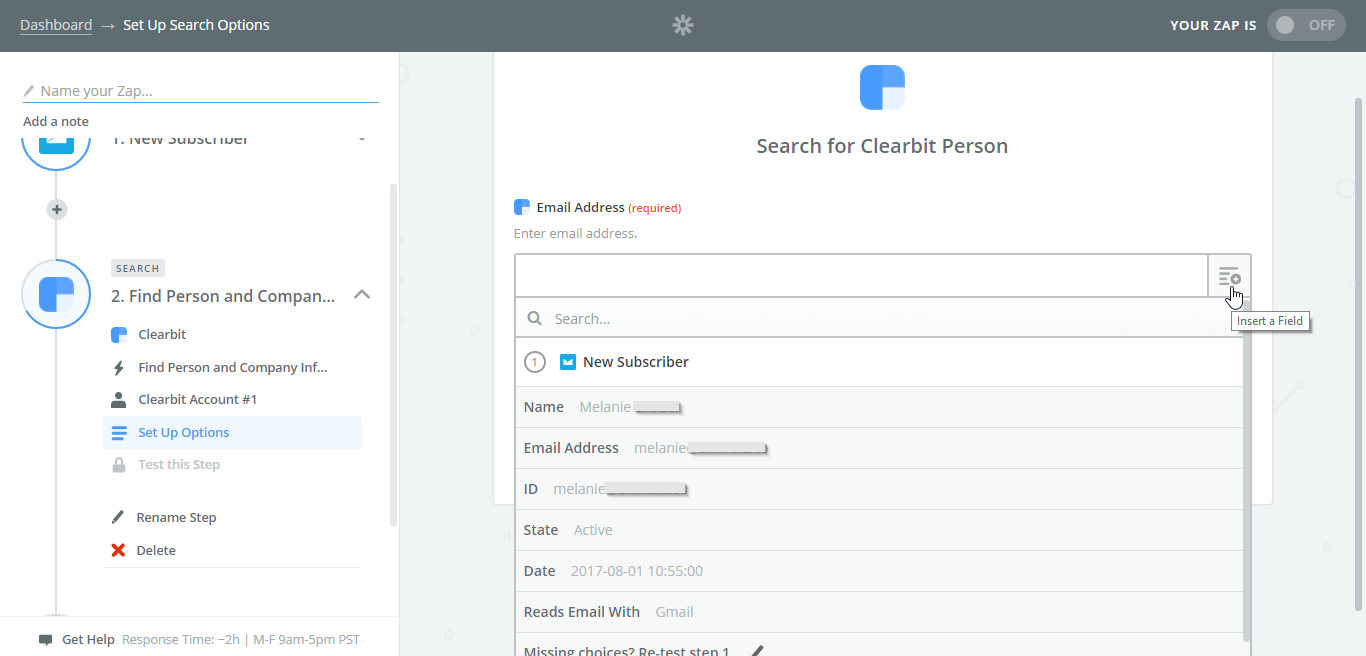
The next step is the trickiest bit. You have to tell Clearbit where to look to get the data that’s requisite for its search. In “Email Address” click the icon on the right of the search bar, and click “New Subscriber.” This is telling Clearbit to use the email inputted into Campaign Monitor as a basis for its search.
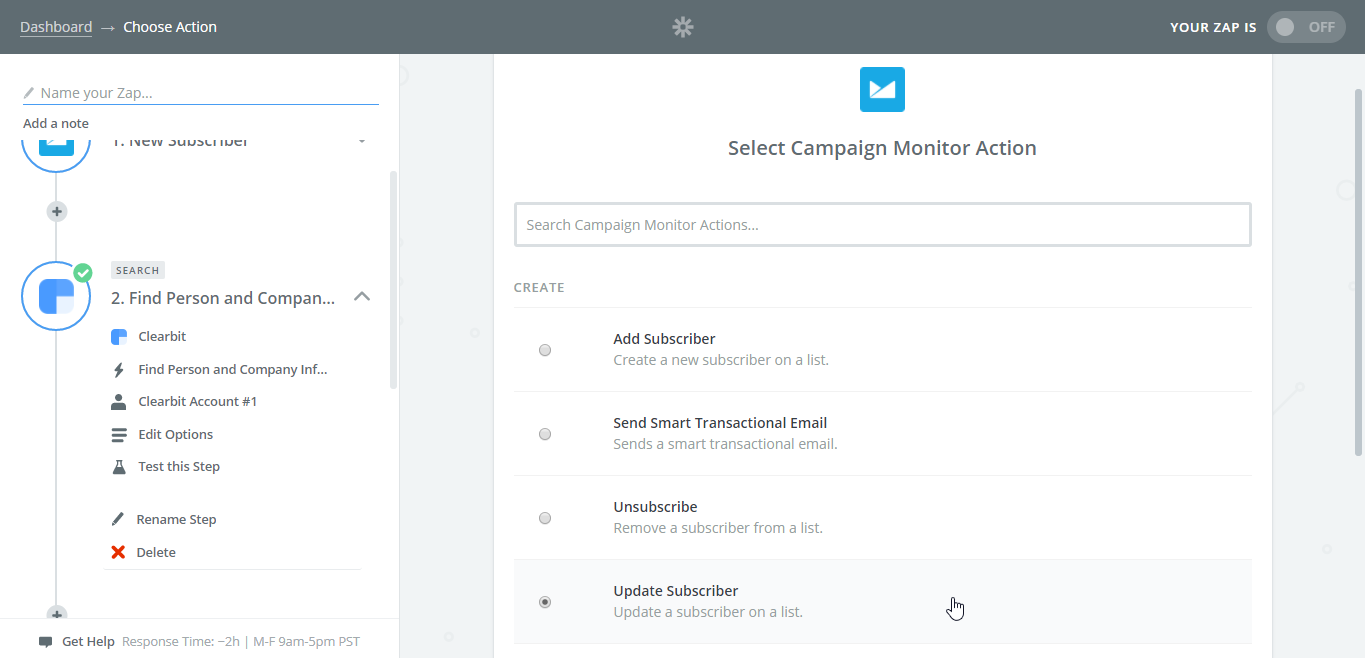
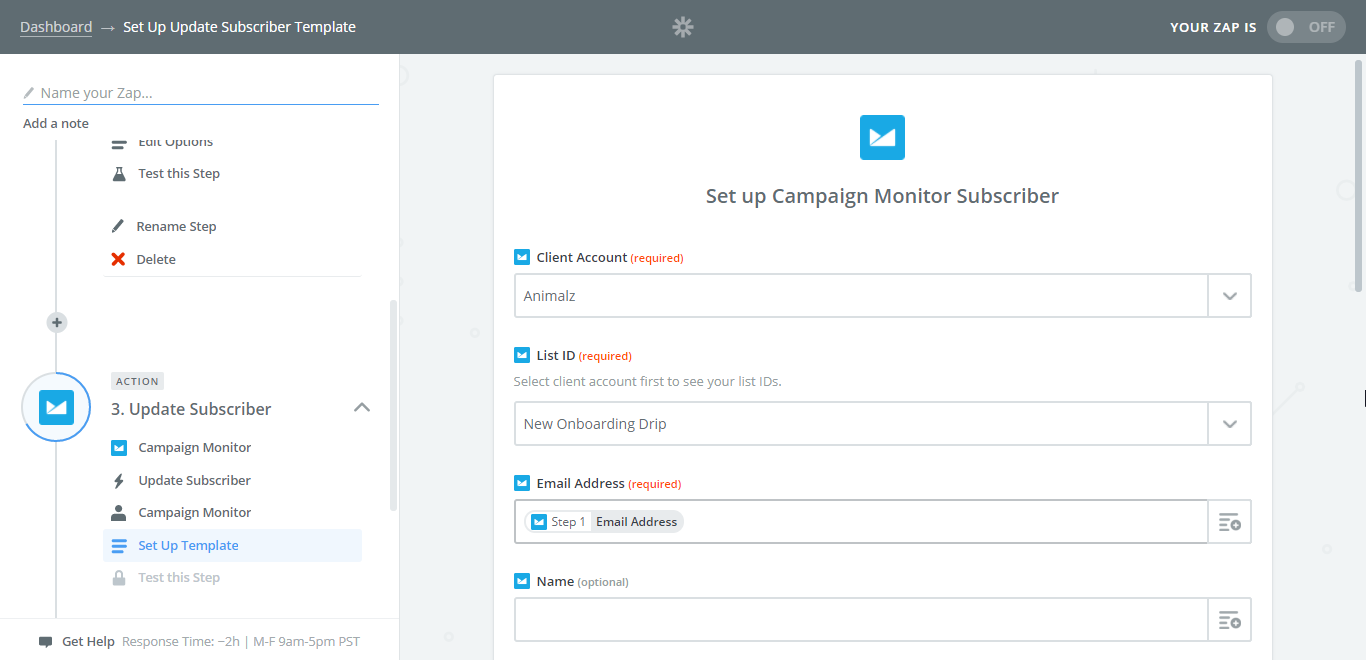
Now you want to tell Clearbit what to do with that data. Select “Update Subscriber,” indicating that you want Clearbit to fill in data for each new user:
At this point, you’ve told Clearbit what the objective is, but now you have to get more specific. You have to match the information that Clearbit will pipe-in with the custom fields that you’ve already created in Campaign Monitor.
Start by inputting the client account and the list ID of the list that you plan to segment.
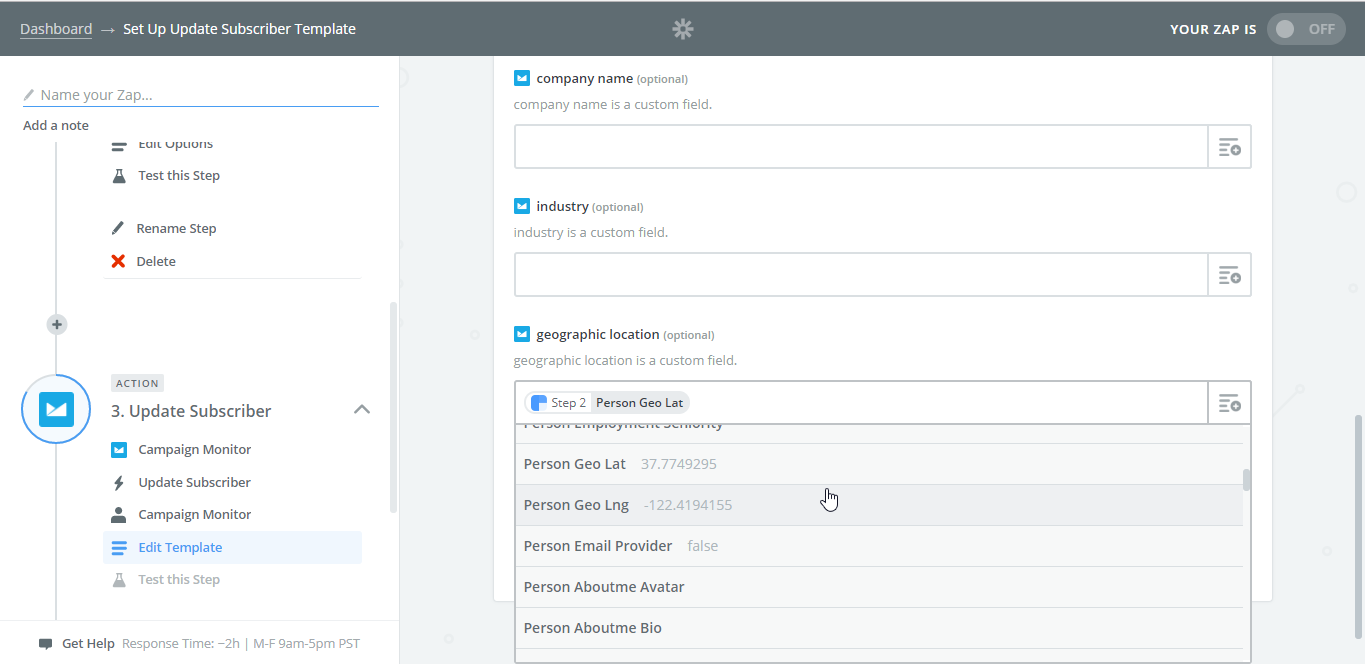
From there, you’ll see the custom fields that you had created, which automatically appear on your dashboard. When you click on the icon on the right, it’ll display all of Clearbit’s fields, so you can match those to the customer Campaign Monitor fields that you’ve created.
Once you complete this step, set up is complete. Run a test by adding 1-2 new emails in Campaign Monitor, waiting five minutes, and then seeing the data you specified filled in:
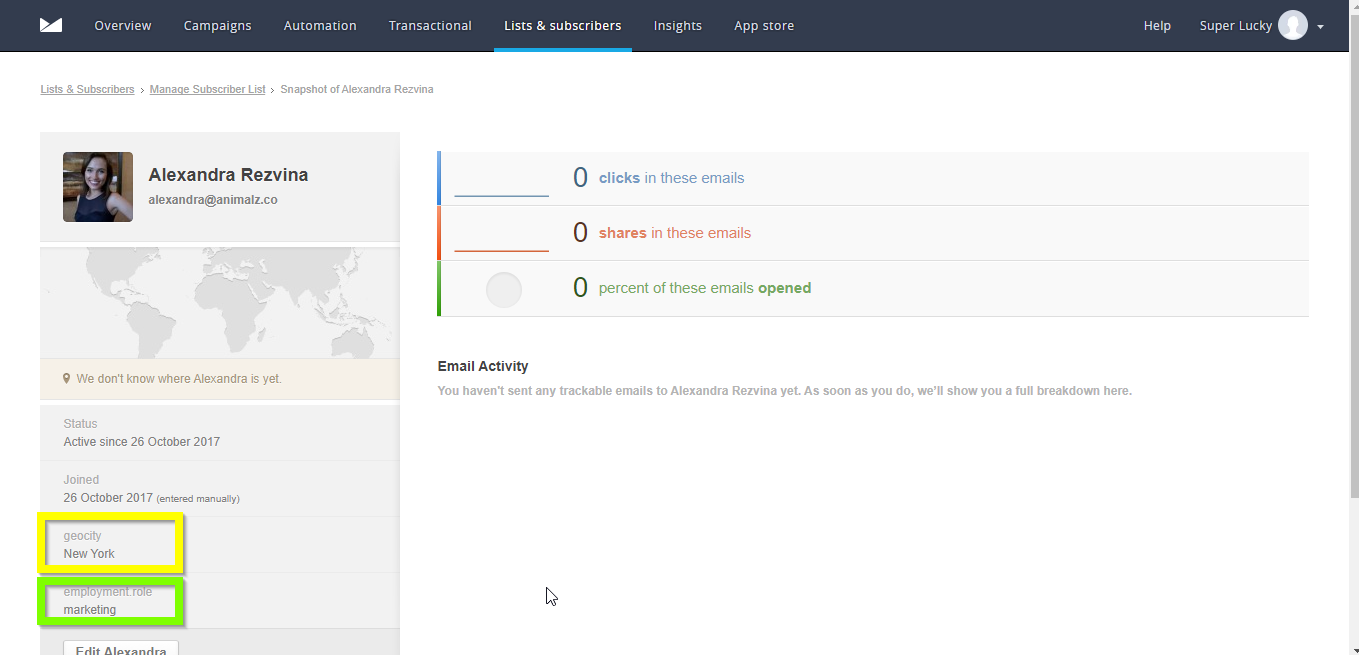
The custom fields you set up in Campaign Monitor have been paired with the data Clearbit looks up and automatically filled in.
This basic formula can be used to create dozens of buyer personas, for whom you can create completely different lifecycle and transactional emails.
Pairing the flexibility of custom fields in your email tool and the amount of data that Clearbit can surface enables you to get creative. You can segment based on basic things like gender, or job. You can also segment for more nuanced things, like people who list hobbies in their social media bios (if, say, you have a side-gig platform), or people under the age of 30 who already occupy mid-to-high level management positions.
It’s Not How You Get Data, It’s How You Use It
Email presents both an opportunity and a challenge. The opportunity is that you’re granted a split second of a subscriber’s attention when they see an email from you. The challenge is making the most of that split-second opportunity. If you plug data into your email outreach, you can show subscribers immediately relevant, helpful information. The more data you plug in, the more people will read your email, and the higher your are chances at a good conversion rate.
Latest posts by FollowUp (see all)
- CRM Integrations: Sometimes Less Is More - March 18, 2021
- Becoming an Account Executive in 5 Totally-Doable Steps - January 29, 2021
- 3 Bad Sales Techniques You Should Give Up Right Now - December 28, 2020